先日の記事ではうまくいきませんでしたが今回は出来たので紹介します。
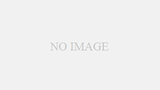
まずは、結果です。
ボタンを押すと長ーいスクロール画面のスクリーンショットが撮れているのがわかると思います。
実装
stack overflowで見つけた以下の記事をベースに必要なところだけを抜き出してコンパクトにしました。追加のパッケージは入れておらず、Flutterの標準機能で実装できました。

How to take screenshot of widget beyond the screen in flutter?
I am using RepaintBoundary to take the screenshot of the current widget which is a listView. But it only captures the content which is visible on the screen at ...
stackoverflow.com
流れとしては、以下の通りです。
- キャプチャ対象を特定するためのGlobalKeyを生成
- キャプチャ対象にGlobalKeyをセット
- キャプチャ実行
ソースにコメントつけてみたので詳しくはそちらをご覧ください。
import 'dart:math';
import 'dart:ui' as ui;
import 'package:flutter/material.dart';
import 'package:flutter/rendering.dart';

void main() => runApp(MyApp());

class MyApp extends StatefulWidget {
  @override
  _MyAppState createState() => _MyAppState();
}

class _MyAppState extends State<MyApp> {
  // キャプチャ対象Widget特定用のGlobalKeyを生成
  final globalKey = GlobalKey();
  // キャプチャ画像
  ui.Image image;
  static final Random random = Random();

  @override
  Widget build(BuildContext context) {
    dynamic body;
    dynamic floatingActionButton;

    /* キャプチャ前*/
    if (image == null) {
      /* キャプチャ対象となるスクロール画面を作成 */
      body = SingleChildScrollView(
        /* キャプチャ対象WidgetをRepaintBoundaryで囲む */
        child: RepaintBoundary(
          key: globalKey, // キャプチャ対象Widget特定用GlobalKeyをセット
          child: Column(
            children: List.generate(
              50,
              (i) => Container(
                color: Color.fromRGBO(random.nextInt(256), random.nextInt(256),
                    random.nextInt(256), 1.0),
                height: 100,
              ),
            ),
          ),
        ),
      );

      /* キャプチャボタン */
      floatingActionButton = FloatingActionButton(
        child: Icon(Icons.camera),
        onPressed: () async {
          /* GlobalKeyからキャプチャ対象Widgetを取得 */
          var renderObject = globalKey.currentContext.findRenderObject();
          RenderRepaintBoundary boundary = renderObject;

          /* キャプチャ実行 */
          ui.Image captureImage = await boundary.toImage();

          /* キャプチャ画像をpngに変換 */
          final byteData = await captureImage.toByteData(
            format: ui.ImageByteFormat.png,
          );

          final pngBytes = byteData.buffer.asUint8List();

          /* あとはファイル化するなり、Shareするなり */

          setState(() => image = captureImage);
        },
      );
    }
    /* キャプチャ後 */
    else {
      /* キャプチャ画像を表示 ※本記事とは関係ないのでソースは割愛 */
      body = UiImageDrawer(image: image);

      /* 最初からボタン */
      floatingActionButton = FloatingActionButton(
        onPressed: () => setState(() => image = null),
        child: Icon(Icons.remove),
      );
    }

    return MaterialApp(
      home: Scaffold(
        appBar: AppBar(),
        body: body,
        floatingActionButton: floatingActionButton,
      ),
    );
  }
}
Flutterで画面外の要素も含めたフルスクリーンショットを撮る方法を紹介しました。
ご参考になれば幸いです。
関連記事

最後に宣伝。自作アプリ作ってます!
コメント
[…] (成功)Flutterで画面外の要素も含めたフルスクリーンショットを撮る方法… 来期アニメ スポンサーリンク シェアする Twitter はてブ コピー take424をフォローする take424 個人開発ブログ […]